Variable Gaging
Variable gaging involves the actual measurement of a dimensional characteristic. It allows for the quantitative and qualitative assessment of the characteristic to be inspected. Values for measurements obtained can be compared to the tolerance limits for the characteristic in order to determine conformance and variation.
Knowing the measured value allows operators to make adjustments to equipment more precisely with less guesswork. Variation in size from part to part can be monitored and adjustments made before bad parts are produced. Finally, variable gaging allows various characteristics to be isolated and measured as individual values.
With respect to screw threads, Variable Gaging facilitates the inspection of the following characteristics:
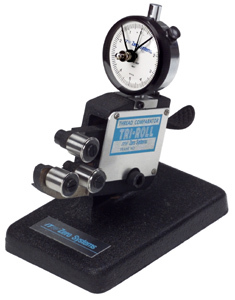
Tri-Roll Comparator Features:
- PRECISION - Rigid construction and constant gaging pressure guarantees consistent and precise readings.
- QUALITIVE READINGS - The Tri-Roll not only indicates whether a threaded part is within assigned limits, it also shows the exact position of the pitch diameter within the tolerance range. In addition, the Tri-Roll will check size and out-of-roundness of plain cylindrical parts.
- GUARANTEED REPEATABILITY - Fixed mounting of the two lower rolls assures a solid support for the workpiece. Only the upper roll actuates the indicator, thereby providing repeatable readings.
- EASY TO SET - Initial setting is made quickly and easily with a class W full form master thread plug or a cylindrical master for types 6 and 7.
- WIDE GAGING RANGE - Frame sizes are provided to cover the diameter range from .060 to 12 inches.
- ADAPTABILITY - Rolls are quickly and easily interchanged within the range of each frame size to measure specific diameter/pitch combinations.
- LONG WORK LIFE - Rolls revolve with the work, distributing wear evenly for a long, precise life.
- ECONOMICAL - Inspection time is significantly faster than when using GO/NO GO ring gages.
For detailed information, call 800-362-9732 or email us with specific questions.
Segment Thread Comparator Features:
- PRECISION - Ball slide construction and constant gaging pressure
- DEFINITIVE - Helical path seating and 60 % peripheral contact provide functional size position within the pitch diameter tolerance assigned.
- GAGING RANGE - Single frame covers a size range of #10 through 3/4".
- VERSATILE - Thread segments are easily changed with the positive alignment feature of mounting pins.
- ECONOMICAL - Inspection time is significantly faster than when using GO/NO GO ring gages.
Internal Thread Comparator:
- PRECISION - Rigid construction and constant gaging pressure assure precise readings.
- DEFINITIVE - The ITC Comparator reads the actual size of the pitch diameter showing its position in relation to the pitch diameter tolerance assigned.
- GAGING RANGE - Single frame covers a size range of #10 through 2 1/2". Larger frames available (up to 8").
- VERSATILE - The positive alignment feature of the frame allows thread segments to be easily interchanged.
- ECONOMICAL - Inspection time is significantly faster than when using GO/NO GO plug gages.
Portions of above text reproduced with permission of Glastonbury/Southern Gage.
